PASTEURIZING EGGS OR MAYO AT HOME : SOUS VIDE : 134.6 °F FOR 2HR
And more on eggs… this is turning into an obsession now! can’t let it go!!!… I don’t think there’s any other ingredient I find as fascinating as the mighty egg. In my previous post on homemade mayo/aioli, I talked about an incredibly easy way to get the emulsion going with the help of a hand blender. I wonder how many people were concerned with eating raw eggs. Although, I’ve never gotten sick (knock on wood!) it does happen, and salmonella will probably land even the fittest individual right in the hospital. There are options, specially here in the US. Buying pasteurized eggs is a possibility. They can be pricey too. The good news is, pasteurizing eggs at home is doable.
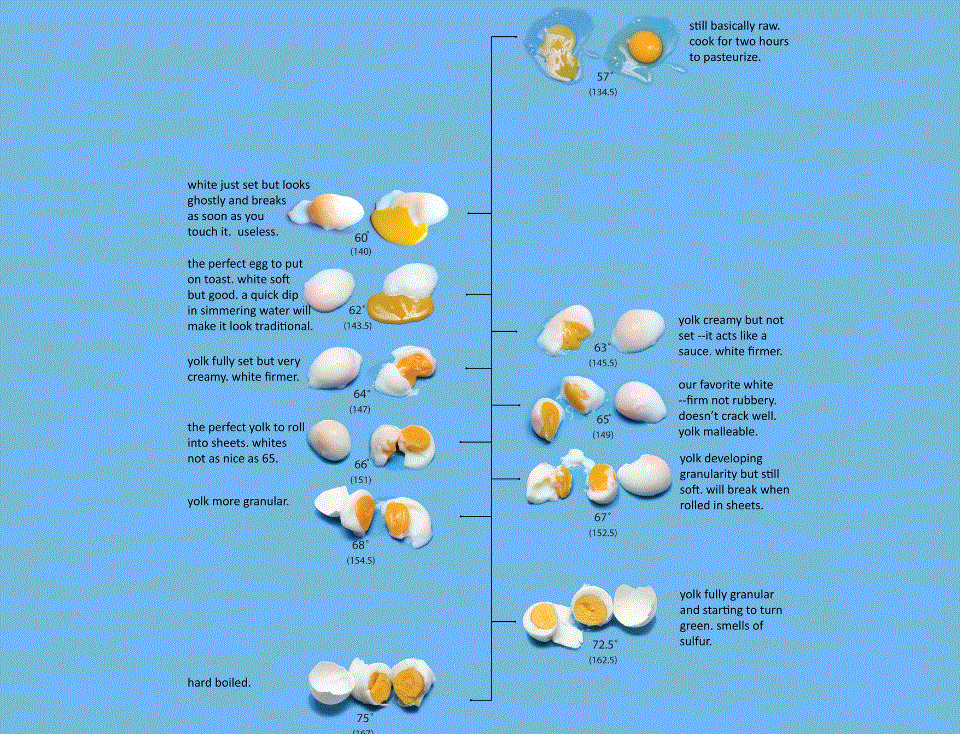
With the help of an immersion circulator is dead simple, but it can too be done with an inexpensive probe thermometer and a big pot filled with water. The idea behind pasteurization is simple. Heat something to a specific temperature by an specific length of time and eventually pathogens die. The lower the temperature, the less the targeted product will change state (phase) or flavor. In the case of an egg, we want to kill the bacteria but we don’t want to cook the egg. It is a well documented fact what different temperatures do to an egg. Take a look at this chart on www.cookingissues.com. It is also a well documented fact what temperature is required to kill the salmonella bacteria. Here’s is a little excerpt from the wikipedia entry on salmonella:
“Salmonella bacteria can survive for weeks outside a living body, and they are not destroyed by freezing. Ultraviolet radiation and heat accelerate their demise; they perish after being heated to 55 °C (131 °F) for 90 min, or to 60 °C (140 °F) for 12 min. To protect against Salmonella infection, heating food for at least ten minutes at 75 °C (167 °F) is recommended, so the centre of the food reaches this temperature.”
The chart suggests 57 °C (134.6 °F) for 2 hours which is well within the safety range stated above. Not only salmonella will be destroyed but all other pathogens present as well. Another source I used was this exciting iphone app which suggested 1 hr 31 minutes for complete pasteurization at the same temperature.
Improvising a sous vide water bath at home isn’t difficult. You do need a thermometer, preferably one with a probe so you can throw it in the pot and forget about it (I wouldn’t let it reach or be to close to the bottom, try suspending it in the middle of the water volume) Start with hot tap water (to save some time) and heat up the pot on medium heat. Checking the temperature and stirring the water. When the temperature reaches 134.6 °F set the stove to the lowest setting. It will be impossible to maintain the water at an exact temperature but some over or undershooting is ok, as long as you don’t go near the temperatures at which the egg will cook. Some practice will be required, just to get familiar with the stove and how fast water heats up and cools off.
Since I’ve made mayo, I figured I could use the same idea and pasteurize my mayo as well. The same principle applies and makes making mayo at home extremely convenient as safe. With the addition of yogurt, the shelf life of homemade mayo can be extended from a few days to a couple of months. Vinegar also helps keep pathogens under control.
I added my aioli to a sealable baggie and and sucked the air out of it using my vacuum chamber sealer. Not all that necessary though. Since we’re pasteurizing a liquid, we could place the mayo in jars, make sure to tighten the lid well and submerge the jars in the water placing an object over them to keep them submerged. If using the improvised sous vide bath, don’t place the jars directly onto the bottom of the pot which is the hottest, the mayo could be cold and the jars could crack. To prevent air pockets in the jars, you could cover the mayo with vegetable oil, which you could drain afterwards.
Pasteurizing Eggs or Mayo at Home : Sous Vide : 134.6 °F for 2hr


